Base! How low can you go? Death row? What a brotha know? ...Wait, I think they meant Bass, hunh? Oh well...
Lets build a base! This is where you need the wood and the pipes.
First, you have to figure out what kind of post you want. Since we've built her up at a neutral trial run, I'm going for a pretty neutral position. Less exciting, but more practical for learning purposes. Mark where the feet will anchor. If you think about it ahead of time, its also a good idea to mark where the flange with attach too.
Make some holes with a 1/4" drill bit where you've marked the feet. On the opposite side of the board, use a spade bit to make a recess so that when you attach the feet you won't have a wobbling base. Attach the feet from the bottom so that the nut attaches through the feet. If you plan ahead and have enough of a variety of pipe segments, you'll have just the right height for the back support of your armature. Obviously, I didn't do that. :D So, thats why I had to shim the front of the flange before I screwed it down. But it works... Chalk another one up to "learning".
Wednesday, April 20, 2011
Tuesday, April 19, 2011
Adventures in Sculpting, Part 4
So, now we have the basic body of the armature done: Legs, torso, shoulders and neck. Yes, in the picture, its standing propped up on my laptop. :D Classy!
Ok! Lets get to work on some arms! From the center pivot to the end of the fingers is the length we're going for. Go back and forth, folding but not cutting, until you have what will end up being 5 ends after two of the folds are cut. Measure the finger length using the armature map. Hold the wires where the wrist pivot lines up. Twist together on the arm part. Cut apart the fingers and wrap them with a thinner wire. Make sure that you DON'T CUT THE FINGERS down to real hand size. LOL I jumped ahead... then I watched that part of the video. You'll see later... Ha ha ha Anyway, here's the pic of the twisted arms:
Remember when I told you that this is a "telescoping armature"? Oh yeah... the arms and head COME OFF! So, of course, we have to make some sort of apparatus to facilitate that. In the video, he uses lengths of square copper tubing with epoxy putty. I think I'll explain this better on the next round. But, next round I'll also be using the correct materials too!
In the above picture is Sean's example figure for how people are structured in 7.5 heads. Epoxy, armature with the shoulder sockets attached, my armature map, some brass tubing and wire cutting pliers. With the help of a smaller tube that has some already hardened epoxy, pack the epoxy into the larger brass tubing on the insertion side. Make sure that the brass tubes are the correct length of the neck and collar bone sections. Trim and score the wire where the epoxy needs to attach. Maybe halfway through the tubes. Clean out the excess epoxy with rubbing alcohol on a q-tip. Be careful not to use too much rubbing alcohol, as it makes the epoxy very gooey and takes a lot longer to harden.
Measure and cut the insertion tube. Be careful not to get any epoxy on the outside of the tube and that the arms are trimmed down far enough that the points all line up on the map. I also marked which arm goes where.
Next, we'll make the base and attach the pipes.
Ok! Lets get to work on some arms! From the center pivot to the end of the fingers is the length we're going for. Go back and forth, folding but not cutting, until you have what will end up being 5 ends after two of the folds are cut. Measure the finger length using the armature map. Hold the wires where the wrist pivot lines up. Twist together on the arm part. Cut apart the fingers and wrap them with a thinner wire. Make sure that you DON'T CUT THE FINGERS down to real hand size. LOL I jumped ahead... then I watched that part of the video. You'll see later... Ha ha ha Anyway, here's the pic of the twisted arms:
Remember when I told you that this is a "telescoping armature"? Oh yeah... the arms and head COME OFF! So, of course, we have to make some sort of apparatus to facilitate that. In the video, he uses lengths of square copper tubing with epoxy putty. I think I'll explain this better on the next round. But, next round I'll also be using the correct materials too!
In the above picture is Sean's example figure for how people are structured in 7.5 heads. Epoxy, armature with the shoulder sockets attached, my armature map, some brass tubing and wire cutting pliers. With the help of a smaller tube that has some already hardened epoxy, pack the epoxy into the larger brass tubing on the insertion side. Make sure that the brass tubes are the correct length of the neck and collar bone sections. Trim and score the wire where the epoxy needs to attach. Maybe halfway through the tubes. Clean out the excess epoxy with rubbing alcohol on a q-tip. Be careful not to use too much rubbing alcohol, as it makes the epoxy very gooey and takes a lot longer to harden.
Measure and cut the insertion tube. Be careful not to get any epoxy on the outside of the tube and that the arms are trimmed down far enough that the points all line up on the map. I also marked which arm goes where.
Next, we'll make the base and attach the pipes.
Saturday, April 9, 2011
Adventures in Sculpting, Part 3
Now we have a plan!
In yesterdays picture, you could see the beginnings of an armature for the upper body. Today comes the fun part: cutting lengths of aluminum armature wire for the actual armature. Well, it would be if I had watched the video instead of plowing on... again. :P
But, moving on... The armature will be supporting approximately 2-3 pounds of pastalina (oil-based modeling clay, which I'm really hoping is mildly recyclable after molding. Cause its a little expensive. Not bad as far as clay goes, but I'm cheap.).
The base will be a 12"x12"x1" wood board. The supports for the armature consist of galvanized steal pipe attached to the board with a flange and wood screws. The supports on the feet are bolted to the board from the bottom and ancored with some of the 2part epoxy putty.
Here is the picture from part 1. You can see the pipe sitting on the table. The t-section will actually reside in the navel of the armature.
Now, obviously, I'll have to use slightly smaller pipes to support my smaller armature. But you get the idea.
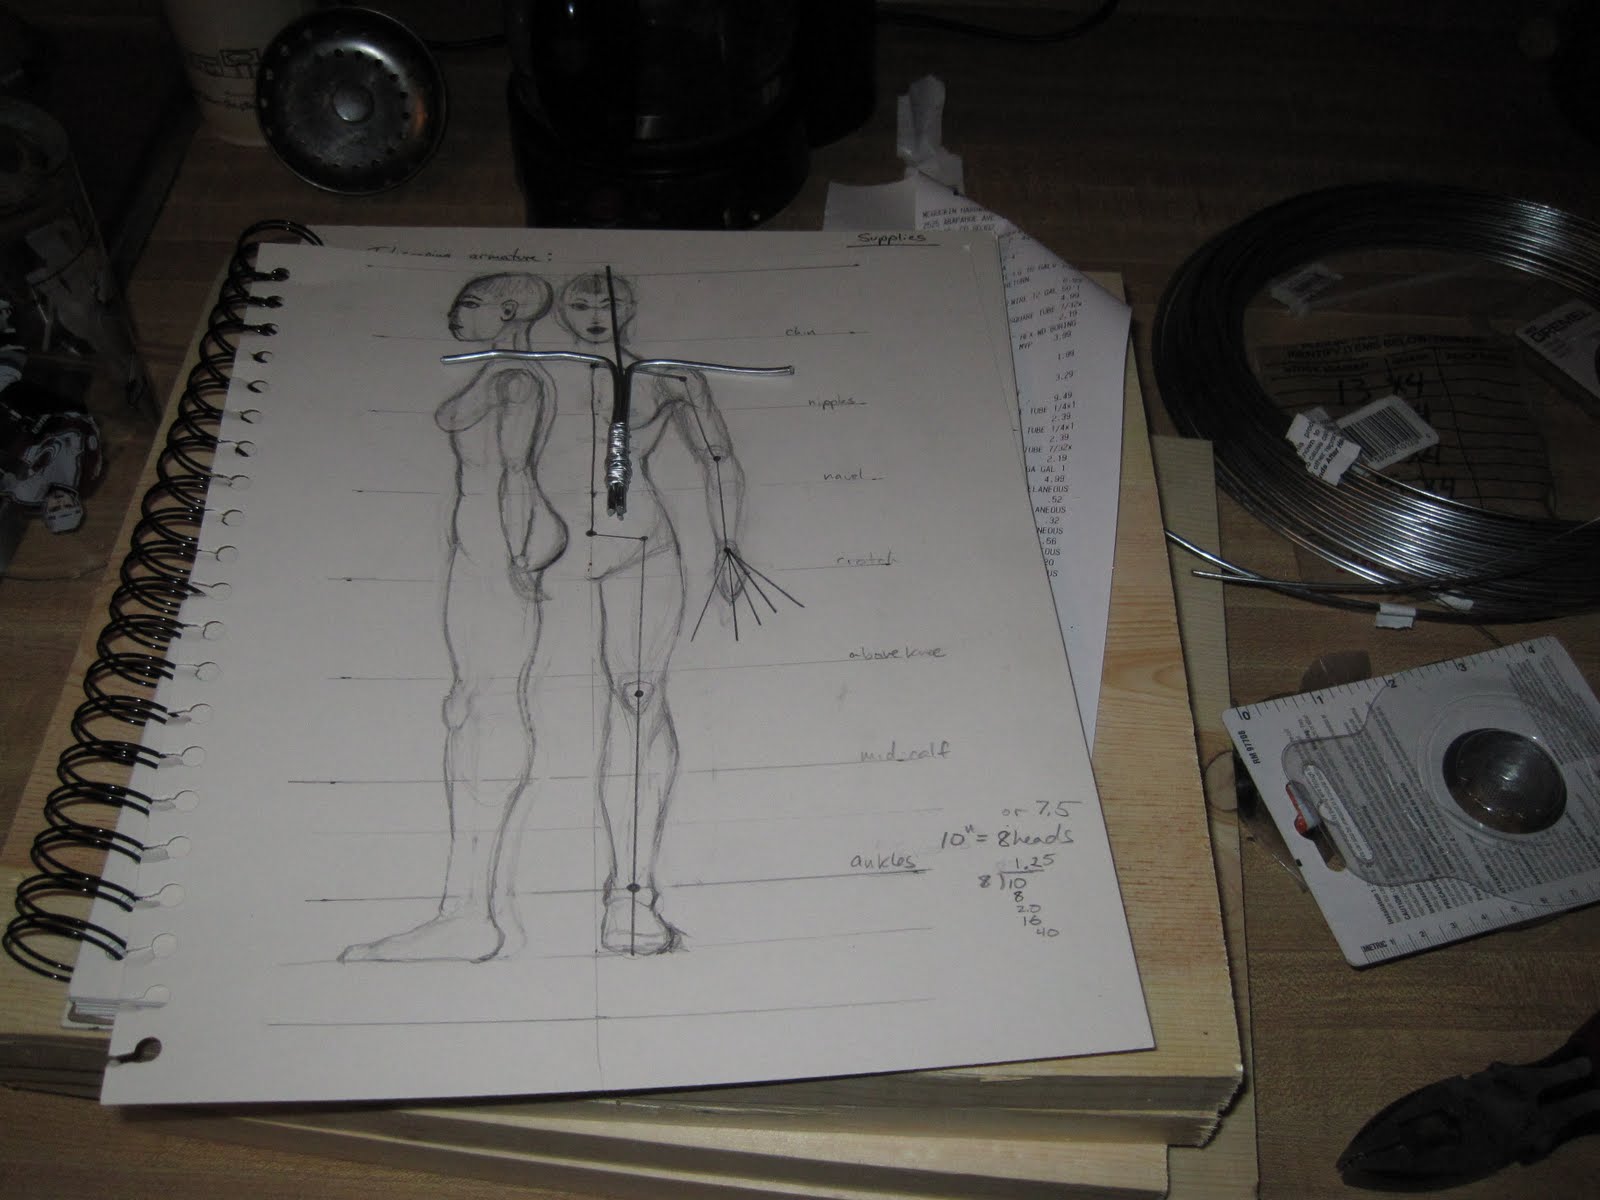
Alright! Next, we draw from the top of the sternum on the front view of the armature map down through the center to about 1/2 way between the navel line and the crotch. Then, from that point, draw to where the insertion of the leg would be and then straight down to the bottom of the foot. Repeat this idea for the arm: Sternum to shoulder, elbow, wrist and a little ways beyond the hand for the fingers (like 1/4"). Be sure and make pivot points for where the hip is, knee, elbow, wrist, ankles, etc.
So, since we're going to make the arms and head removable, we're going to measure the wire about 1/4" beyond the shoulder pivot and down along the spine line and through to 1/4" beyond the foot. Loop and go back up past the navel and cut. Repeat on the other side. Straighten out the wire, except where the foot loop is. Twist the overlap together and epoxy into the t-pipe section where it would sit comfortably inside the sculpture. This is where it would be easier to show you, but since I did it a little different, I think I'll cover this on the next sculpture attempt.
Mine looked like this when I was done putting the armature beginnings along with the wired on head piece.
Now would be a good time to mark with small pieces of duct tape where the knees are for later reference.
In yesterdays picture, you could see the beginnings of an armature for the upper body. Today comes the fun part: cutting lengths of aluminum armature wire for the actual armature. Well, it would be if I had watched the video instead of plowing on... again. :P
But, moving on... The armature will be supporting approximately 2-3 pounds of pastalina (oil-based modeling clay, which I'm really hoping is mildly recyclable after molding. Cause its a little expensive. Not bad as far as clay goes, but I'm cheap.).
The base will be a 12"x12"x1" wood board. The supports for the armature consist of galvanized steal pipe attached to the board with a flange and wood screws. The supports on the feet are bolted to the board from the bottom and ancored with some of the 2part epoxy putty.
Here is the picture from part 1. You can see the pipe sitting on the table. The t-section will actually reside in the navel of the armature.
Now, obviously, I'll have to use slightly smaller pipes to support my smaller armature. But you get the idea.
Alright! Next, we draw from the top of the sternum on the front view of the armature map down through the center to about 1/2 way between the navel line and the crotch. Then, from that point, draw to where the insertion of the leg would be and then straight down to the bottom of the foot. Repeat this idea for the arm: Sternum to shoulder, elbow, wrist and a little ways beyond the hand for the fingers (like 1/4"). Be sure and make pivot points for where the hip is, knee, elbow, wrist, ankles, etc.
So, since we're going to make the arms and head removable, we're going to measure the wire about 1/4" beyond the shoulder pivot and down along the spine line and through to 1/4" beyond the foot. Loop and go back up past the navel and cut. Repeat on the other side. Straighten out the wire, except where the foot loop is. Twist the overlap together and epoxy into the t-pipe section where it would sit comfortably inside the sculpture. This is where it would be easier to show you, but since I did it a little different, I think I'll cover this on the next sculpture attempt.
Mine looked like this when I was done putting the armature beginnings along with the wired on head piece.
Now would be a good time to mark with small pieces of duct tape where the knees are for later reference.
Friday, April 8, 2011
Adventures in Sculpting, Part 2
Okay! Things are coming along now... Its kind of like baking a cake or sewing a dress. There are certain things that really need to be established BEFORE you start cooking or piecing together... or building armatures.
So, first things first. What are you making?
I'm gonna start very simply and do just a simple female nude. Women are just more fun to sculpt. Men are all bulges and hard lines while women are curves and softness. Plus, with less extreme angles, I think it will be easier to mold down the road. Or, at least, thats kind of what I hope. :D Once you figured out what, you need to sketch out what it will look like. This is more of a stylized character picture. Since I'm doing just a nude, I skipped this step.
Next is the plan.
For constructing a figure, you need an armature that will support what you're trying to build. To make the armature, you need whats called an armature map. This is sort of a sketched out character that fits into the scale of what you're making. Humans are classically 7.5-8 heads tall. If you're doing a 10 inch figure at 8 heads, there are 8 lengths dividing the character/armature map.
From the top line down: Head/crown, chin, nipples(or just below if male), navel, crotch, just above the knee, mid-calf, ankle and bottom of foot.
So, first things first. What are you making?
I'm gonna start very simply and do just a simple female nude. Women are just more fun to sculpt. Men are all bulges and hard lines while women are curves and softness. Plus, with less extreme angles, I think it will be easier to mold down the road. Or, at least, thats kind of what I hope. :D Once you figured out what, you need to sketch out what it will look like. This is more of a stylized character picture. Since I'm doing just a nude, I skipped this step.
Next is the plan.
For constructing a figure, you need an armature that will support what you're trying to build. To make the armature, you need whats called an armature map. This is sort of a sketched out character that fits into the scale of what you're making. Humans are classically 7.5-8 heads tall. If you're doing a 10 inch figure at 8 heads, there are 8 lengths dividing the character/armature map.
From the top line down: Head/crown, chin, nipples(or just below if male), navel, crotch, just above the knee, mid-calf, ankle and bottom of foot.
Thursday, April 7, 2011
Adventures in Sculpting, Part 1
As some of you know, I get wild hairs from time to time and start projects.
As more of you may know, I love to sculpt. There is something about the three dimensional aspect of the medium that draws me. Probably a little of that is why I love doing hair as much as I do.
In any case, I've started a new little side project involving sculpting a telescoping figure for molding purposes. The reason behind this is simple: if the arms and head are removable, then it will be easier to mold later. At least, thats the hope.
I've never attempted anything like this before, and with the help of some extremely good videos and my better half and professional illustrator, Sean; things are going very well so far. :D
These pictures were from my first attempt. As you can see, I was drinking a little wine with my sculpting... which I think was part of why attempt #1 was less successful than I had originally hoped.
In these pictures are some of what I've been using:
Tres Picos Borsao Garnacha 2008 (wine, and not one I'd recommend), oil-based modeling clay called Pastilina, pipe armature support, EP-400 Epoxy Putty, 300ft of 18 gauge wire and a sketchpad with a pencil.
As more of you may know, I love to sculpt. There is something about the three dimensional aspect of the medium that draws me. Probably a little of that is why I love doing hair as much as I do.
In any case, I've started a new little side project involving sculpting a telescoping figure for molding purposes. The reason behind this is simple: if the arms and head are removable, then it will be easier to mold later. At least, thats the hope.
I've never attempted anything like this before, and with the help of some extremely good videos and my better half and professional illustrator, Sean; things are going very well so far. :D
These pictures were from my first attempt. As you can see, I was drinking a little wine with my sculpting... which I think was part of why attempt #1 was less successful than I had originally hoped.
In these pictures are some of what I've been using:
Tres Picos Borsao Garnacha 2008 (wine, and not one I'd recommend), oil-based modeling clay called Pastilina, pipe armature support, EP-400 Epoxy Putty, 300ft of 18 gauge wire and a sketchpad with a pencil.
Thursday, February 10, 2011
One day at a time
"Change yourself and your work will be different." Positive Thinking Every Day by Norman Vincent Peale
If A + B + C = D, then A + B + C = D every time. If you keep adding the same things together, you'll keep getting the same results. A + B + C does not equal P.
What if the only variable that you have control over is yourself? Well, if the desired result is different than the result that you've been getting, then the only choice is to change yourself.
I've been working at trying to change my attitudes and how I look at the world around me. Trying to temper my proclivities to better fit my place in this life, but I kept getting the same results.
Thats when I realized that it wasn't the change in myself that was needed. It was the change in where I was that needed to happen. A flower can't grow in a dark closet. Just like a jungle cat doesn't do well in the arctic circle. I'm not meant for big corporate structure.
So tomorrow I say goodbye to the last three and a half years in an environment that I just didn't belong in and move on to something new. Something fresh... something different... something new...
I'm excited to see the new outcomes. Aren't you?
If A + B + C = D, then A + B + C = D every time. If you keep adding the same things together, you'll keep getting the same results. A + B + C does not equal P.
What if the only variable that you have control over is yourself? Well, if the desired result is different than the result that you've been getting, then the only choice is to change yourself.
I've been working at trying to change my attitudes and how I look at the world around me. Trying to temper my proclivities to better fit my place in this life, but I kept getting the same results.
Thats when I realized that it wasn't the change in myself that was needed. It was the change in where I was that needed to happen. A flower can't grow in a dark closet. Just like a jungle cat doesn't do well in the arctic circle. I'm not meant for big corporate structure.
So tomorrow I say goodbye to the last three and a half years in an environment that I just didn't belong in and move on to something new. Something fresh... something different... something new...
I'm excited to see the new outcomes. Aren't you?
Wednesday, February 9, 2011
Hello Again...
"Faith plus dynamic dreams plus real working at it is a go-ahead formula that gets you where you want to go." Positive Thinking Every day by Norman Vincent Peale
How I interpret this is that you need a combination of belief in yourself, the forethought and creative inspiration of what you'd most love to do, and good ole-fashioned hard work to get where you want to go.
Now, how does one go about doing that?
I think that first off, you should know where you're aiming for.
Realistically, what is the end result that you want to accomplish? What is your goal?
Okay! Now, what are the obstacles in your way and are they overcomable?
If no, then you need to adjust the goal. If yes, what are the steps that are needed to overcome obstacle 1, 2, 3, etc?
Now that the obstacles in my own life [Going to school in the first place, getting my license, getting out of my current job (my last job is Friday)] are out of the way. I have the biggest obstacle yet to come: Finding a new job.
But I have found a little bit of a bright spot in this crazy quest of mine; A booth rent in a small shop in Boulder. When I went in there yesterday evening to look inside and get an idea of whether or not it was even a possibility of a place to work, I was very pleasantly surprised. Not only was it pretty nice inside, the man and lady that owned and operated the shop were very nice and quite helpful. Easy to talk to and comfortable.
Something else that really resonated with me was actually something that Sean's Mom says quite a bit: "You have to do what feeds your soul."
Which is exactly what the lady said during the 45 minutes we all were talking. I'm thinking that there is something to that, actually. Maybe I'll end up there... who knows?
How I interpret this is that you need a combination of belief in yourself, the forethought and creative inspiration of what you'd most love to do, and good ole-fashioned hard work to get where you want to go.
Now, how does one go about doing that?
I think that first off, you should know where you're aiming for.
Realistically, what is the end result that you want to accomplish? What is your goal?
Okay! Now, what are the obstacles in your way and are they overcomable?
If no, then you need to adjust the goal. If yes, what are the steps that are needed to overcome obstacle 1, 2, 3, etc?
Now that the obstacles in my own life [Going to school in the first place, getting my license, getting out of my current job (my last job is Friday)] are out of the way. I have the biggest obstacle yet to come: Finding a new job.
But I have found a little bit of a bright spot in this crazy quest of mine; A booth rent in a small shop in Boulder. When I went in there yesterday evening to look inside and get an idea of whether or not it was even a possibility of a place to work, I was very pleasantly surprised. Not only was it pretty nice inside, the man and lady that owned and operated the shop were very nice and quite helpful. Easy to talk to and comfortable.
Something else that really resonated with me was actually something that Sean's Mom says quite a bit: "You have to do what feeds your soul."
Which is exactly what the lady said during the 45 minutes we all were talking. I'm thinking that there is something to that, actually. Maybe I'll end up there... who knows?
Subscribe to:
Posts (Atom)