
Sunday, May 1, 2011

Tuesday, April 26, 2011
Adventures in Sculpting, Part 8
Okay! Two things to remember when sculpting women: First, their shoulders and hips should work out to be fairly close in circumference, and second, they have muscles too, they're just much more smooth.


You might have noticed that the neck is a lot shorter now and the shoulders are not nearly as wide. I'm going to trim up the head shape a bit too, but I'm also going to add hair. One thing I'm noticing as I look back at the pictures is that I really need to change the hands... but that can wait, I think... For now, I need to work on those hips, and maybe add some hair. Yeah. Really long hair is what I'm thinking...


You might have noticed that the neck is a lot shorter now and the shoulders are not nearly as wide. I'm going to trim up the head shape a bit too, but I'm also going to add hair. One thing I'm noticing as I look back at the pictures is that I really need to change the hands... but that can wait, I think... For now, I need to work on those hips, and maybe add some hair. Yeah. Really long hair is what I'm thinking...
Monday, April 25, 2011
"Easy A"
If you haven't heard about it yet, there is a fairly new-ish movie out from Director Will Gluck by the name of "Easy A". Normally, I avoid modern teen movies much like I avoid people I suspect might have the plague.
Yes, I rented "Twilight", but only to see what the hype was all about. Actually, when I was watching it drag on and on, I was tempted several times to throw my shoe at the television. As a hairstylist, I was coerced into watching it by several of its fans, a few of which were my age, and a few that are much older than me. No, I didn't like it. Insipid is a word I really like for the plot and vapid is a word I really love for the female lead... but this isn't about that.
If you have any love of John Hughes movies (Pretty in Pink, Sixteen Candles, The Breakfast Club, Weird Science, Ferris Bueller's Day Off, or Some Kind of Wonderful to name a few), GO WATCH Easy A. It had the quick wit, smart plot and breezy humor of a tribute to John Hughes. Of course, no one could match his stark honesty and brilliant storytelling, but this really came through for me.
Starring Emma Stone, who was also in Superbad, its a rollicking take on High School Drama. This is what Netflix says: "High school is the setting for this freewheeling comedic twist on Nathaniel Hawthorne's 19th-century novel The Scarlet Letter. Ambitious student Olive decides to boost her popularity by pretending to be the school slut."
Check out the trailer here:CLICK HERE!
Yes, I rented "Twilight", but only to see what the hype was all about. Actually, when I was watching it drag on and on, I was tempted several times to throw my shoe at the television. As a hairstylist, I was coerced into watching it by several of its fans, a few of which were my age, and a few that are much older than me. No, I didn't like it. Insipid is a word I really like for the plot and vapid is a word I really love for the female lead... but this isn't about that.
If you have any love of John Hughes movies (Pretty in Pink, Sixteen Candles, The Breakfast Club, Weird Science, Ferris Bueller's Day Off, or Some Kind of Wonderful to name a few), GO WATCH Easy A. It had the quick wit, smart plot and breezy humor of a tribute to John Hughes. Of course, no one could match his stark honesty and brilliant storytelling, but this really came through for me.
Starring Emma Stone, who was also in Superbad, its a rollicking take on High School Drama. This is what Netflix says: "High school is the setting for this freewheeling comedic twist on Nathaniel Hawthorne's 19th-century novel The Scarlet Letter. Ambitious student Olive decides to boost her popularity by pretending to be the school slut."
Check out the trailer here:CLICK HERE!
Friday, April 22, 2011
Adventures in Sculpting, Part 7
Get some meat on those bones!
I'm still thinking that I want a different pose for the arms, but at least with the telescoping arms and head, I have options.
The next step in sculpting a figure is to add musculature. Every figure has some sort of muscle structure, even if its underneath a layer of bulk and a larger set character. We're doing a female nude, so we have to rough in the muscles first, and soften them later.


Something to keep in mind when you're doing this: Don't worry if the neck is too long or the shoulders too wide or whatever. Just get the clay on there and rough it in. Its just like sketching, but with forms instead of charcoal. Detail comes later...
I'm still thinking that I want a different pose for the arms, but at least with the telescoping arms and head, I have options.
The next step in sculpting a figure is to add musculature. Every figure has some sort of muscle structure, even if its underneath a layer of bulk and a larger set character. We're doing a female nude, so we have to rough in the muscles first, and soften them later.


Something to keep in mind when you're doing this: Don't worry if the neck is too long or the shoulders too wide or whatever. Just get the clay on there and rough it in. Its just like sketching, but with forms instead of charcoal. Detail comes later...
Thursday, April 21, 2011
Adventures in Sculpting, Part 6
Clay!! Whew! Finally time to put a little clay on this thing.
Oil-based clay needs to be warmed up in order to make it more pliable and easier to work with. This generally involves a small oven. Lucky for us, they're very easy to build. Get a file or paper box, line it and the inside of the lid with aluminum foil. Using a standard clip-on lamp that you can buy at any hardware store, measure and cut a hole that is about 1" smaller than the diameter of the metal bell on the light. Don't forget to line the hole with foil as well. A 60 watt light is perfect for this.

Cut smaller sections of the clay and place in the oven. After about 15 minutes, you should be ready to get started. Start with a basic skeletal structure to begin. Pelvis, skull, arms, legs, feet, ribcage, etc.


This would be a good time to check out a book about anatomy. That way, you can use the pictures as a reference for where structures reside.
Oil-based clay needs to be warmed up in order to make it more pliable and easier to work with. This generally involves a small oven. Lucky for us, they're very easy to build. Get a file or paper box, line it and the inside of the lid with aluminum foil. Using a standard clip-on lamp that you can buy at any hardware store, measure and cut a hole that is about 1" smaller than the diameter of the metal bell on the light. Don't forget to line the hole with foil as well. A 60 watt light is perfect for this.
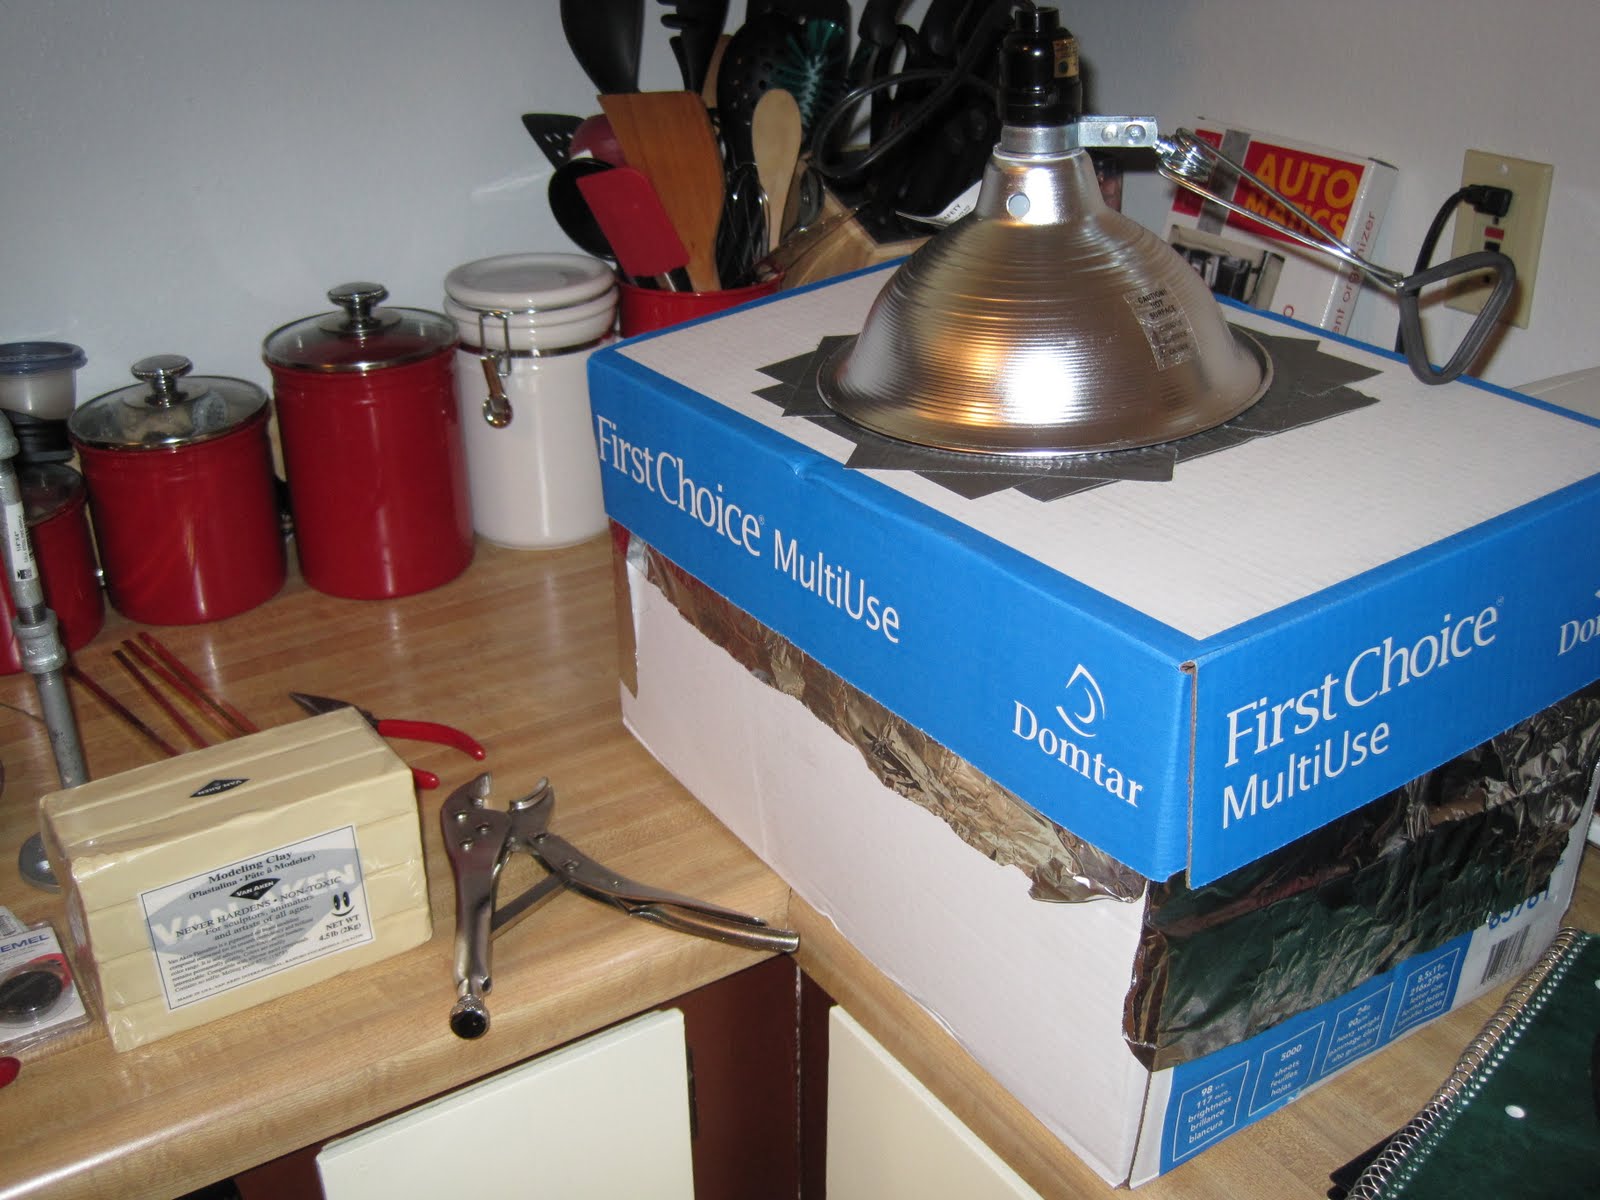
Cut smaller sections of the clay and place in the oven. After about 15 minutes, you should be ready to get started. Start with a basic skeletal structure to begin. Pelvis, skull, arms, legs, feet, ribcage, etc.


This would be a good time to check out a book about anatomy. That way, you can use the pictures as a reference for where structures reside.
Wednesday, April 20, 2011
Adventures in Sculpting, Part 5
Base! How low can you go? Death row? What a brotha know? ...Wait, I think they meant Bass, hunh? Oh well...
Lets build a base! This is where you need the wood and the pipes.
First, you have to figure out what kind of post you want. Since we've built her up at a neutral trial run, I'm going for a pretty neutral position. Less exciting, but more practical for learning purposes. Mark where the feet will anchor. If you think about it ahead of time, its also a good idea to mark where the flange with attach too.
Make some holes with a 1/4" drill bit where you've marked the feet. On the opposite side of the board, use a spade bit to make a recess so that when you attach the feet you won't have a wobbling base. Attach the feet from the bottom so that the nut attaches through the feet. If you plan ahead and have enough of a variety of pipe segments, you'll have just the right height for the back support of your armature. Obviously, I didn't do that. :D So, thats why I had to shim the front of the flange before I screwed it down. But it works... Chalk another one up to "learning".

Lets build a base! This is where you need the wood and the pipes.

First, you have to figure out what kind of post you want. Since we've built her up at a neutral trial run, I'm going for a pretty neutral position. Less exciting, but more practical for learning purposes. Mark where the feet will anchor. If you think about it ahead of time, its also a good idea to mark where the flange with attach too.
Make some holes with a 1/4" drill bit where you've marked the feet. On the opposite side of the board, use a spade bit to make a recess so that when you attach the feet you won't have a wobbling base. Attach the feet from the bottom so that the nut attaches through the feet. If you plan ahead and have enough of a variety of pipe segments, you'll have just the right height for the back support of your armature. Obviously, I didn't do that. :D So, thats why I had to shim the front of the flange before I screwed it down. But it works... Chalk another one up to "learning".

Tuesday, April 19, 2011
Adventures in Sculpting, Part 4
So, now we have the basic body of the armature done: Legs, torso, shoulders and neck. Yes, in the picture, its standing propped up on my laptop. :D Classy!

Ok! Lets get to work on some arms! From the center pivot to the end of the fingers is the length we're going for. Go back and forth, folding but not cutting, until you have what will end up being 5 ends after two of the folds are cut. Measure the finger length using the armature map. Hold the wires where the wrist pivot lines up. Twist together on the arm part. Cut apart the fingers and wrap them with a thinner wire. Make sure that you DON'T CUT THE FINGERS down to real hand size. LOL I jumped ahead... then I watched that part of the video. You'll see later... Ha ha ha Anyway, here's the pic of the twisted arms:

Remember when I told you that this is a "telescoping armature"? Oh yeah... the arms and head COME OFF! So, of course, we have to make some sort of apparatus to facilitate that. In the video, he uses lengths of square copper tubing with epoxy putty. I think I'll explain this better on the next round. But, next round I'll also be using the correct materials too!

In the above picture is Sean's example figure for how people are structured in 7.5 heads. Epoxy, armature with the shoulder sockets attached, my armature map, some brass tubing and wire cutting pliers. With the help of a smaller tube that has some already hardened epoxy, pack the epoxy into the larger brass tubing on the insertion side. Make sure that the brass tubes are the correct length of the neck and collar bone sections. Trim and score the wire where the epoxy needs to attach. Maybe halfway through the tubes. Clean out the excess epoxy with rubbing alcohol on a q-tip. Be careful not to use too much rubbing alcohol, as it makes the epoxy very gooey and takes a lot longer to harden.

Measure and cut the insertion tube. Be careful not to get any epoxy on the outside of the tube and that the arms are trimmed down far enough that the points all line up on the map. I also marked which arm goes where.

Next, we'll make the base and attach the pipes.

Ok! Lets get to work on some arms! From the center pivot to the end of the fingers is the length we're going for. Go back and forth, folding but not cutting, until you have what will end up being 5 ends after two of the folds are cut. Measure the finger length using the armature map. Hold the wires where the wrist pivot lines up. Twist together on the arm part. Cut apart the fingers and wrap them with a thinner wire. Make sure that you DON'T CUT THE FINGERS down to real hand size. LOL I jumped ahead... then I watched that part of the video. You'll see later... Ha ha ha Anyway, here's the pic of the twisted arms:

Remember when I told you that this is a "telescoping armature"? Oh yeah... the arms and head COME OFF! So, of course, we have to make some sort of apparatus to facilitate that. In the video, he uses lengths of square copper tubing with epoxy putty. I think I'll explain this better on the next round. But, next round I'll also be using the correct materials too!

In the above picture is Sean's example figure for how people are structured in 7.5 heads. Epoxy, armature with the shoulder sockets attached, my armature map, some brass tubing and wire cutting pliers. With the help of a smaller tube that has some already hardened epoxy, pack the epoxy into the larger brass tubing on the insertion side. Make sure that the brass tubes are the correct length of the neck and collar bone sections. Trim and score the wire where the epoxy needs to attach. Maybe halfway through the tubes. Clean out the excess epoxy with rubbing alcohol on a q-tip. Be careful not to use too much rubbing alcohol, as it makes the epoxy very gooey and takes a lot longer to harden.

Measure and cut the insertion tube. Be careful not to get any epoxy on the outside of the tube and that the arms are trimmed down far enough that the points all line up on the map. I also marked which arm goes where.

Next, we'll make the base and attach the pipes.
Subscribe to:
Posts (Atom)